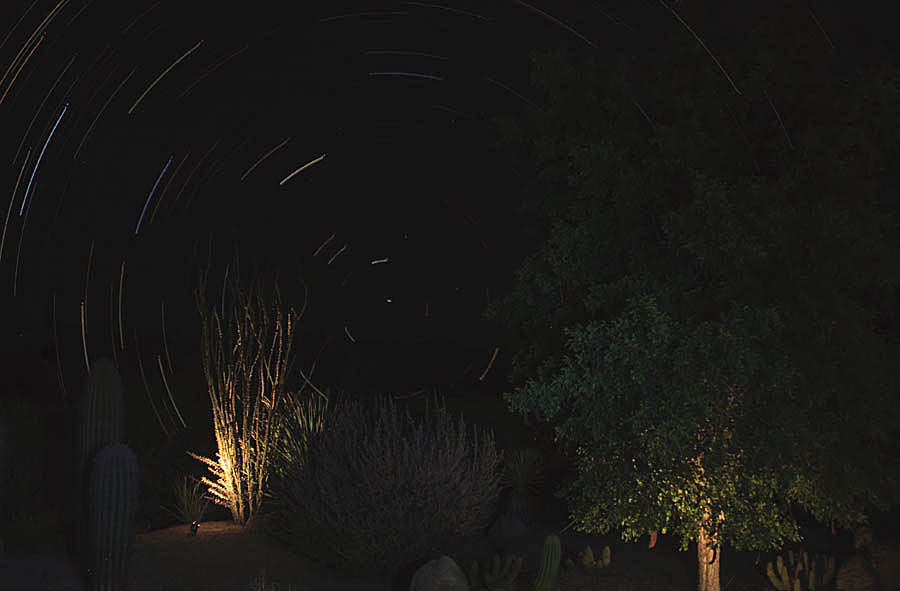
I’ve been intrigued by star trail photography for some time. What do I mean? Star trail photography is using a long exposure of a clear, starlit sky to produce streaks (trails) caused by the relative movement of the stars as the earth rotates. By aiming the camera at the North Star (Polaris), the pattern is a series of concentric circles around Polaris, the single dot in the centre of the image below. Because Polaris is aligned with the earth’s axis of rotation it does not move relative to earth as the earth rotates.
I have a single star trails image to share in today’s post, taken in North Scottsdale, AZ where it is very dark at night and the stars can be seen very clearly. Ideal conditions for this type of shot.

This image is a composite of 131 pictures taken over the course of an hour or so. All but one were used to produce the actual star trails. I integrated a single image of the illuminated tree and shrubbery in the foreground to add some interest to the picture.
If you are interested in how I created this picture, read on. If not, today’s post was a short read.
The first step is to find Polaris in the sky. It is the bright star located at the end of the handle on the Little Dipper, part of the Ursa Major constellation. Look northward to see it. If you can’t see it, you can use an iPad app called Star Chart to help find it. Once I located Polaris, I aimed my camera right at it.
In the good old days of film photography, you could simply open the camera shutter, continuously exposing the film for as long as you needed to capture the desired length of star trails. It is not so simple with digital photography. Leaving the shutter open for an extended period causes the sensor to overheat and generate “noise” that deteriorates the image quality. I can’t imagine what it must do to the sensor itself! The answer is to take a sequence of shorter exposures (30 seconds in my case) and subsequently combine them in Photoshop.
To take the pictures, I set my tripod-mounted camera on continuous shooting mode, much as you would for taking a sequence of sports action shots. With the camera in manual operation, I set the shutter at 30 seconds and took test shots at a few different aperture settings to get the desired exposure. The aperture setting I chose was f3.5. I had the focal length set at 18 mm to give me the widest possible view of the sky. I used a cable remote switch to hold the shutter open. Since I was on continuous shooting mode, the shutter closed and re-opened every 30 seconds, creating 130 images over 65 minutes. While this was going on I went inside to prepare my laptop for processing those 130 shots into a single picture.
My research showed that there are many different ways to produce a star trails picture from a series of digital images. The options range from commercially available software packages to techniques developed for Photoshop. I chose the latter.
The concept is simple. You begin with two of the images. You combine them by copying one and pasting it atop the other. Because of the 30 second delay between them, the position of each star is slightly different. The “pasted” stars are slightly offset from their position on the original image and you have the beginning of the star trail. The new image is similarly combined with the next one in the sequence and so on until you’ve combined the entire 130. Sound tedious and time consuming? Absolutely! Fortunately, it is easily automated using a Photoshop action (their name for a program) which does all that for you. Again, I took a break and waited for the computer to complete its task.
After another 1/2 hour, I had a combined picture of all 130 of the original images, the sky as you see it in the picture above. As a standalone image, it was pretty uninteresting, so I combined it with a foreground picture I had taken after shooting all the sky images. I stacked the two images with the foreground on top. I used the “lighten” blending mode to allow the star trails to show through. The showed through everywhere, so I simply erased those in the bottom of the image, where they shouldn’t appear.
I think I’ve satisfied my curiosity. I now know how to do this and I’ve concluded that the result is not worth the effort involved. To get a better result, I would need to use more images (more continuous trails). To go further requires a better power supply to the camera; my battery was almost exhausted after the 130 shots. My computer struggled to manage the large number of files; 8 GB of RAM is pretty much at its limit. I could create a series of smaller files by combining fewer at a time, then combine the resultant few to get the final picture. That would increase the time and effort even further and doesn’t seem worth it.
I enjoyed the experience but I’m done with it for now. At least until I can find more efficient technology!
